Difference between revisions of "Configuring postback for Voluum"
(Created page with "In order to set up Postback with <b>Voluum</b>, the following steps are required: 1. Go to the campaign settings.<br/> 2. Open the S2S Postbacks tab.<br/> 3. URL - specify th...") |
(No difference)
|
Revision as of 13:28, 27 December 2023
In order to set up Postback with Voluum, the following steps are required:
1. Go to the campaign settings.
2. Open the S2S Postbacks tab.
3. URL - specify the address:
https://kdtrk.net/ru/postback/?data={external_id}&status={status}&cost={cpc}
Send method - select GET method.
Status - select the required conversion statuses.
4. Save
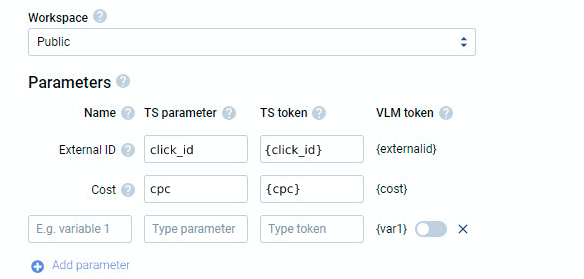
5. Go to Campaigns and select "Options"
6. In the second column of campaign parameters, we specify the name of the parameter where the source sends the actual value of the required label in the macro. In this case, it is click_id
7. In the third column of campaign parameters, we specify the {click_id} macro where the source sends the actual value:
8. Save
9. In the URL of the offerer, you need to wrap the parameter name from the second column in the macro as {click_id} and pass in the matching parameter.
Example: https://example.com/?utm_source=voluum&external={click_id}
10. Next, go to the Kadam personal cabinet and create a new campaign. In the "Campaign URL" field, paste the copied link with the click_id parameter
You will also need to select the "your option" acceptance pattern:
set the field confirmed to confirmed
to hold - hold
for the field rejected - declined, trash
After all the settings, it is definitely recommended that before launching the campaign, do a test conversion strictly according to |instructions
