Difference between revisions of "Audience settings"
(Новая страница: «== Creating an audience == Targeting the target audience is a tool that allows you to customize your advertising campaigns for specific users of interest. This fu…») |
(→Creating an audience) |
||
| (9 intermediate revisions by the same user not shown) | |||
| Line 1: | Line 1: | ||
== Creating an audience == | == Creating an audience == | ||
| − | Targeting | + | Targeting a specific audience allows you to customize your advertising campaign to cater to specific users interests. |
1. To set up the target audience, go to the “Campaigns” / “Audiences” section and click on the “Create an audience” button. | 1. To set up the target audience, go to the “Campaigns” / “Audiences” section and click on the “Create an audience” button. | ||
| − | [[ | + | [[File:Audiencemanscr2.png|100px|centre|frame]] |
| − | 2. In the " | + | [[File:Audiencemanscr1.png|100px|centre|frame]] |
| − | [[ | + | 2. In the "Audience name" field, you must specify the corresponding name of the created audience.<br /> |
| + | 3. In the "Campaigns" field, you must select campaigns from which you want to create an audience.<br /> | ||
| + | 4. In the “Stats for the last days” select days number of campaign's stats<br /> | ||
| + | 5. In the "The duration of user participation in the audience" specify the number of days after showing interest that the user will refer to your audience.<br /> | ||
| + | 6. In the "Actions" users who complete selected actions will go to the audience. You have to select at least one action.<br /> | ||
| + | 7. To complete the creation of the target audience, you must click on the "Save" button.<br /> | ||
| + | [[File:Audiencemanscr3.png| 100px | center | frame]] | ||
| − | + | 8. To select a targeted audience in a campaign, go to the "Campaigns" / "Campaigns" section and click on the "Edit" button for the selected campaign. In the interface that appears in the "Audience" field in the field "Include:" select name of audience. | |
| − | + | [[File: Audiencemanscr4.png | 100px | center | frame]] | |
| − | + | ||
| − | + | ||
| − | + | ||
| − | + | ||
| − | + | ||
| − | + | ||
| − | + | ||
| − | + | ||
| − | + | ||
| − | + | ||
| − | + | ||
| − | + | ||
| − | 8. To select a targeted audience in a campaign, go to the "Campaigns" / "Campaigns" section and click on the "Edit" button for the selected campaign. In the interface that appears | + | |
| − | [[File: | + | |
Latest revision as of 13:29, 1 November 2021
Creating an audience
Targeting a specific audience allows you to customize your advertising campaign to cater to specific users interests.
1. To set up the target audience, go to the “Campaigns” / “Audiences” section and click on the “Create an audience” button.
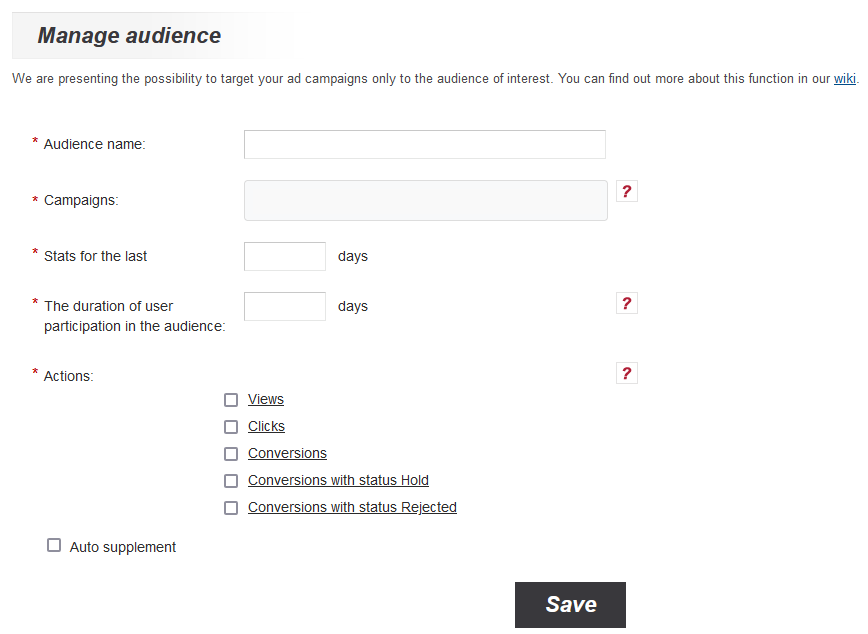
2. In the "Audience name" field, you must specify the corresponding name of the created audience.
3. In the "Campaigns" field, you must select campaigns from which you want to create an audience.
4. In the “Stats for the last days” select days number of campaign's stats
5. In the "The duration of user participation in the audience" specify the number of days after showing interest that the user will refer to your audience.
6. In the "Actions" users who complete selected actions will go to the audience. You have to select at least one action.
7. To complete the creation of the target audience, you must click on the "Save" button.
8. To select a targeted audience in a campaign, go to the "Campaigns" / "Campaigns" section and click on the "Edit" button for the selected campaign. In the interface that appears in the "Audience" field in the field "Include:" select name of audience.


