Добавление баннера/en — различия между версиями
Admin (обсуждение | вклад) (Новая страница: «Adding a banner») |
Admin (обсуждение | вклад) |
||
| Строка 1: | Строка 1: | ||
<languages/> | <languages/> | ||
| − | + | Banner - a graphic image of an advertising character, which can be both static and contain animated elements. | |
| − | + | ||
| − | + | In order to add [[Advertising Formats # .D0.91.D0.B0.D0.BD.D0.BD.D0.B5.D1.80.D0.BD.D1.8B.D0.B9_.D1.84. D0.BE.D1.80.D0.BC.D0.B0.D1.82. | Banner]] in an advertising campaign it is necessary: <br /> | |
| − | [[ | + | In the personal account in the list of campaigns, click on the "Manage [[Advertising Formats # .D0.91.D0.B0.D0.BD.D0.BD.D0.B5.D1.80.D0.BD.D1.8B.D0. B9_.D1.84.D0.BE.D1.80.D0.BC.D0.B0.D1.82. | Banners]] "of the desired campaign (image 1). |
| − | + | [[File: banner1.png | alt = Manage banners | center | frame | image 1]] | |
| − | == | + | Then the management page will be opened [[Advertising formats # .D0.91.D0.B0.D0.BD.D0.BD.D0.B5.D1.80.D0.BD.D1.8B.D0.B9_.D1.84 .D0.BE.D1.80.D0.BC.D0.B0.D1.82. | Banners]]. |
| − | + | ||
| − | [[ | + | == Adding banners == |
| − | + | To add [[Advertising Formats # .D0.91.D0.B0.D0.BD.D0.BD.D0.B5.D1.80.D0.BD.D1.8B.D0.B9_.D1.84.D0.BE .D1.80.D0.BC.D0.B0.D1.82. | Banners]] you need to click on the button "Add [[Advertising Formats # .D0.91.D0.B0.D0.BD.D0.BD.D0. B5.D1.80.D0.BD.D1.8B.D0.B9_.D1.84.D0.BE.D1.80.D0.BC.D0.B0.D1.82. | Banner]] "" (image 2). | |
| − | [[ | + | [[File: banner2.png | alt = Add banner | center | frame | image 2]] |
| − | + | After that, the creation page is Banner (image 3). | |
| − | === | + | [[File: banner3.png | alt = Creating a banner | center | frame | image 3]] |
| − | + | To create [[Advertising Formats # .D0.91.D0.B0.D0.BD.D0.BD.D0.B5.D1.80.D0.BD.D1.8B.D0.B9_.D1.84.D0.BE .D1.80.D0.BC.D0.B0.D1.82. | Banner]] you must fill in all the required fields and upload an image. | |
| − | === Url.=== | + | |
| − | + | === Banner Name. === | |
| − | === | + | The text that will be displayed in your account as [[Formats of advertising # .D0.91.D0.B0.D0.BD.D0.BD.D0.B5.D1.80.D0.BD.D1.8B.D0.B9_ .D1.84.D0.BE.D1.80.D0.BC.D0.B0.D1.82. | Banner]]. The name [[Advertising Formats # .D0.91.D0.B0.D0.BD.D0.BD.D0.B5.D1.80.D0.BD.D1.8B.D0.B9_.D1.84.D0.BE. D1.80.D0.BC.D0.B0.D1.82. | Banner]] is not displayed on the webmasters site. If you do not fill this field, the name is [[Formats of advertising # .D0.91.D0.B0.D0.BD.D0.BD.D0.B5.D1.80.D0.BD.D1.8B.D0.B9_.D1 .84.D0.BE.D1.80.D0.BC.D0.B0.D1.82. | Banner]] will correspond to its id in the system. |
| − | + | === Url. === | |
| − | + | Link to go when clicking on [[Formats of advertising # .D0.91.D0.B0.D0.BD.D0.BD.D0.B5.D1.80.D0.BD.D1.8B.D0.B9_.D1.84 .D0.BE.D1.80.D0.BC.D0.B0.D1.82. | Banner]]. The domain specified in the campaign settings must match the Url [[Advertising Formats # .D0.91.D0.B0.D0.BD.D0.BD.D0.B5.D1.80.D0.BD.D1.8B.D0 .B9_.D1.84.D0.BE.D1.80.D0.BC.D0.B0.D1.82. | Banner]]. | |
| + | === File. === | ||
| + | Valid file extensions: gif, jpg, jpeg, png ;. Maximum size: 150.0 KB. | ||
| + | |||
| + | The list of sizes supported by the system [[Advertising Formats # .D0.91.D0.B0.D0.BD.D0.BD.D0.B5.D1.80.D0.BD.D1.8B.D0.B9_.D1.84.D0 .BE.D1.80.D0.BC.D0.B0.D1.82. | Banners]]: | ||
{| class="standard" | {| class="standard" | ||
|style="width:100px;"|88x31 | |style="width:100px;"|88x31 | ||
| Строка 28: | Строка 32: | ||
|300x300 | |300x300 | ||
|600x500 | |600x500 | ||
| + | |||
|- | |- | ||
|100x200 | |100x200 | ||
| Строка 94: | Строка 99: | ||
|970x90 | |970x90 | ||
|} | |} | ||
| − | + | ||
| − | [[ | + | You can also add several banners at once in one form. To do this, simply click the "Select file" button and select a new banner file that will meet the requirements (image 4). |
| − | === | + | [[File:Loadneskbann.png|alt=Создание баннера|centre|frame|image 4]] |
| − | + | ||
| − | === | + | === Size. === |
| − | + | If the size of the file being uploaded is supported by the system, then the size of [[Advertising Formats # .D0.91.D0.B0.D0.BD.D0.BD.D0.B5.D1.80.D0.BD.D1.8B.D0.B9_. D1.84.D0.BE.D1.80.D0.BC.D0.B0.D1.82. | Banner]] is automatically detected. | |
| − | === | + | === Pause after moderation. === |
| − | + | After saving [[Advertising Formats # .D0.91.D0.B0.D0.BD.D0.BD.D0.B5.D1.80.D0.BD.D1.8B.D0.B9_.D1.84.D0.BE .D1.80.D0.BC.D0.B0.D1.82. | Banner]] will be sent for moderation. In case of successful moderation and when this field is checked, the status of advertising material will be “suspended” and not “active”. | |
| − | === | + | |
| − | + | === Set bids. === | |
| − | [[ | + | Here you can customize bids for specific promotional material. By default, the bids specified in the campaign settings are used. |
| − | + | === Keyword Targeting. === | |
| − | [[ | + | Displays a list of [[Keyword Word Principles | Keywords]] that have been added to the campaign settings. After all the fields are filled, you must click on the "Create" button (image 5). |
| − | + | [[File:Создать тизер 4.png| alt = Create banner | center | frame | image 5]] | |
| − | === | + | Or to the button "Save and add more" (image 6). |
| − | + | [[File:Создать тизер 5.png| alt = Save and add more | center | frame | image 6]] | |
| − | == | + | In case of correct filling of the form fields, [[Advertising formats # .D0.91.D0.B0.D0.BD.D0.BD.D0.B5.D1.80.D0.BD.D1.8B.D0.B9_.D1. 84.D0.BE.D1.80.D0.BC.D0.B0.D1.82. | Banner]] is saved and the form for adding a new material opens. <br /> |
| − | *[[ | + | |
| − | *[[ | + | === Banner Generator. === |
| − | *[[ | + | In addition to the standard method, you can create and add a banner yourself using the [[Banner Generator | Banner Generator]] tool. |
| − | *[[ | + | |
| − | *[[ | + | == See also == |
| + | * [[Creating an advertising campaign]]. | ||
| + | * [[Add teaser]]. | ||
| + | * [[Adding Push Notifications]]. | ||
| + | * [[Adding a contextual announcement]]. | ||
| + | * [[Add Clickunder]]. | ||
Текущая версия на 14:58, 11 февраля 2019
Banner - a graphic image of an advertising character, which can be both static and contain animated elements.
In order to add Banner in an advertising campaign it is necessary:
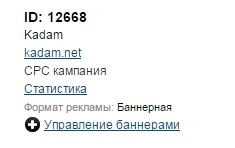
In the personal account in the list of campaigns, click on the "Manage Banners "of the desired campaign (image 1).
Then the management page will be opened Banners.
Содержание
Adding banners
To add Banners you need to click on the button "Add Banner "" (image 2).
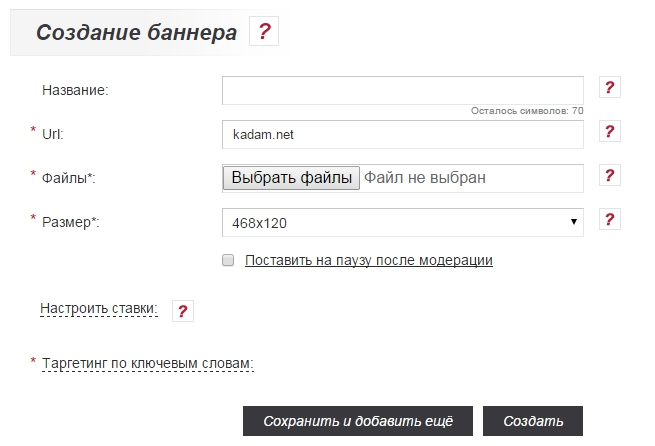
After that, the creation page is Banner (image 3).
To create Banner you must fill in all the required fields and upload an image.
Banner Name.
The text that will be displayed in your account as Banner. The name Banner is not displayed on the webmasters site. If you do not fill this field, the name is Banner will correspond to its id in the system.
Url.
Link to go when clicking on Banner. The domain specified in the campaign settings must match the Url Banner.
File.
Valid file extensions: gif, jpg, jpeg, png ;. Maximum size: 150.0 KB.
The list of sizes supported by the system Banners:
| 88x31 | 170x100 | 300x250 | 980x120 | |
| 100x100 | 180x80 | 300x300 | 600x500 | |
| 100x200 | 180x150 | 300x600 | 1280x752 | |
| 120x60 | 200x80 | 320x50 | 320x100 | |
| 600x976 | 120x90 | 200x200 | 336x280 | |
| 1024x768 | 120x240 | 200x300 | 384x115 | |
| 800x1232 | 120x600 | 230x60 | 400x40 | |
| 962x553 | 120x800 | 234x60 | 468x60 | |
| 1280x800 | 125x125 | 240x100 | 468x120 | |
| 1600x2560 | 125x250 | 240x400 | 500x100 | |
| 601x914 | 150x60 | 250x130 | 500x200 | |
| 914x601 | 160x60 | 250x250 | 580x400 | |
| 1067x619 | 160x120 | 250x360 | 728x90 | |
| 160x400 | 270x60 | 930x180 | 640x480 | |
| 160x600 | 300x50 | 970x90 |
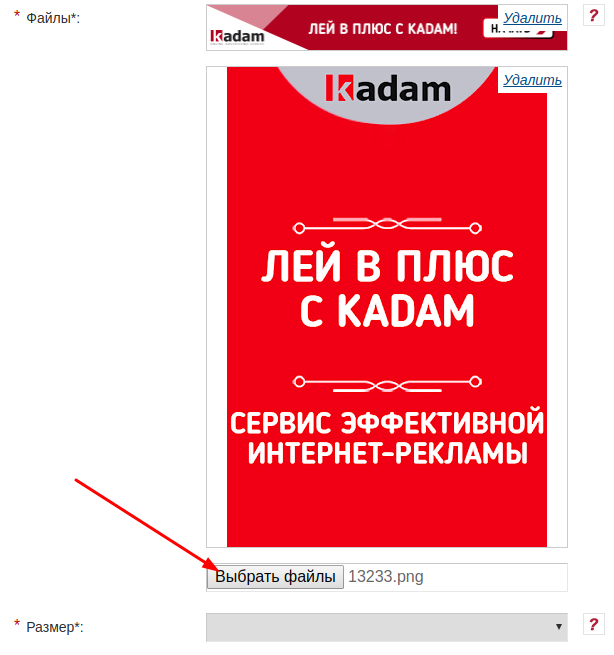
You can also add several banners at once in one form. To do this, simply click the "Select file" button and select a new banner file that will meet the requirements (image 4).
Size.
If the size of the file being uploaded is supported by the system, then the size of Banner is automatically detected.
Pause after moderation.
After saving Banner will be sent for moderation. In case of successful moderation and when this field is checked, the status of advertising material will be “suspended” and not “active”.
Set bids.
Here you can customize bids for specific promotional material. By default, the bids specified in the campaign settings are used.
Keyword Targeting.
Displays a list of Keywords that have been added to the campaign settings. After all the fields are filled, you must click on the "Create" button (image 5).
Or to the button "Save and add more" (image 6).
In case of correct filling of the form fields, Banner is saved and the form for adding a new material opens.
Banner Generator.
In addition to the standard method, you can create and add a banner yourself using the Banner Generator tool.


