Генератор баннеров/en — различия между версиями
Admin (обсуждение | вклад) (Новая страница: «Banner Generator») |
Admin (обсуждение | вклад) |
||
| Строка 1: | Строка 1: | ||
<languages/> | <languages/> | ||
| − | ''' | + | '''Banner Generator''' is a graphical editor that allows to quickly create [[Advertising Formats # .D0.91.D0.B0.D0.BD.D0.BD.D0.B5.D1.80.D0.BD.D1 .8B.D0.B9_.D1.84.D0.BE.D1.80.D0.BC.D0.B0.D1.82. | Banner]] one of the most popular sizes in the system: <br /> |
| − | 728x90<br> | + | 728x90 <br /> |
| − | 468x60<br> | + | 468x60 <br /> |
| − | 336x280<br> | + | 336x280 <br /> |
| − | 320x100<br> | + | 320x100 <br /> |
| − | 320x50<br> | + | 320x50 <br /> |
| − | 300x600<br> | + | 300x600 <br /> |
| − | 300x250<br> | + | 300x250 <br /> |
| − | 250x250<br> | + | 250x250 <br /> |
| − | 240x400<br> | + | 240x400 <br /> |
| − | 200x200<br> | + | 200x200 <br /> |
| − | 160x600<br> | + | 160x600 <br /> |
| − | 120x600<br> | + | 120x600 <br /> |
| − | ''' | + | |
| − | <p style="margin-left: 36%;"><youtube>94YjunWo1mQ</youtube></p> | + | |
| − | + | '''See the video instructions for creating a banner in our generator:''' | |
| − | [[ | + | |
| − | <!-- | + | <p style="margin-left:36%;"><youtube>94YjunWo1mQ</youtube></p> |
| − | <p style="margin-left: 36%;"><youtube>KniSqf6FIGU</youtube></p> | + | |
| + | |||
| + | Access to the editor can be obtained by clicking on "Banner Generator" button in the list of banner campaign materials. (image 1) | ||
| + | [[File: Knopkagen.png | alt = banner generator from scratch | center | frame |image 1]] | ||
| + | |||
| + | <!-- See the video instructions for creating a banner in our generator: | ||
| + | |||
| + | |||
| + | <p style = "margin-left: 36%;"> <youtube>KniSqf6FIGU</youtube></p> | ||
https://youtu.be/94YjunWo1mQ | https://youtu.be/94YjunWo1mQ | ||
--> | --> | ||
| − | + | ||
| + | In the banner generator you can select 4 main options: | ||
<ul> | <ul> | ||
| − | <li> | + | |
| − | <li> | + | <li> add and edit image </ li> |
| − | <li> | + | <li> add and edit buttons </ li> |
| − | <li> | + | <li> add and edit text </ li> |
| − | </ul> | + | <li> frame and background settings </ li> |
| − | == | + | </ ul> |
| − | + | ||
| − | [[ | + | |
| − | + | == Adding and editing an image == | |
| − | [[ | + | To upload an image, click "Add Image" (image 2). |
| − | + | [[File: Addpicture.png | alt = loading image | center | frame | image 2]] | |
| − | [[ | + | The boot menu appears on the right. You can download an image file from your device or specify a link to an image from any site on the Internet. You can download both a static image and an animated one. Supported file extensions: gif, jpg, jpeg, png. The weight of the image file should not exceed 1 mb (image 3). |
| − | == | + | [[File: Pictureadd.png | alt = loading image | center | frame | image 3]] |
| − | + | After the image has been loaded, it will be possible to resize it, set and edit the image frame, round the corners, set the transparency, rotate (image 4). | |
| − | [[ | + | [[File: Addpic.png | alt = loading image | center | frame | image 4]] |
| − | + | == Adding and editing a button == | |
| − | [[ | + | To add a button to the banner, click "Add button" button (image 5). |
| − | == | + | [[File: Addbutton.png | alt = loading image | center | frame | image 5]] |
| − | + | The button is added automatically and it will be possible to resize it, set the background color and button frame, round corners, set transparency, shadow, rotate (image 6). | |
| − | [[ | + | [[File: Buttonadd.png | alt = loading image | center | frame | image 6]] |
| − | + | == Adding and editing text == | |
| − | [[ | + | To add text to the banner you need to click "Add text" (image 7). |
| − | + | [[File: Addtext.png | alt = loading image | center | frame | image 7]] | |
| − | [[ | + | The text is added automatically and you can change its content, font, size, style, alignment, color, shadow, rotate (image 8). |
| − | == | + | [[File: Textadd.png | alt = loading image | center | frame | image 8]] |
| − | + | ||
| − | [[ | + | You can switch between all banner elements using the mouse cursor by clicking on the desired element and using permutations of plans between elements (image 9). |
| − | + | [[File: Perekluchateli.png | alt = loading image | center | frame | image 9]] | |
| − | [[ | + | |
| − | == | + | == Setting the frame and background == |
| − | *[[ | + | Clicking on the color squares you can set the background color, frame color and frame thickness, if necessary (image 10). |
| − | *[[ | + | [[File: Ramkafon.png | alt = loading image | center | frame | image 10]] |
| + | |||
| + | After editing all the elements to add a banner to the campaign, you need to click the "Create" button (image 11). | ||
| + | [[File: Creategen.png | alt = loading image | center | frame | image 11]] | ||
| + | == See also. == | ||
| + | * [[Add teaser]]. | ||
| + | * [[Adding a banner]]. | ||
Текущая версия на 15:08, 11 февраля 2019
Banner Generator is a graphical editor that allows to quickly create Banner one of the most popular sizes in the system:
728x90
468x60
336x280
320x100
320x50
300x600
300x250
250x250
240x400
200x200
160x600
120x600
See the video instructions for creating a banner in our generator:
Access to the editor can be obtained by clicking on "Banner Generator" button in the list of banner campaign materials. (image 1)

In the banner generator you can select 4 main options:
- add and edit image </ li>
- add and edit buttons </ li>
- add and edit text </ li>
- frame and background settings </ li>
</ ul>
Содержание
Adding and editing an image
To upload an image, click "Add Image" (image 2).
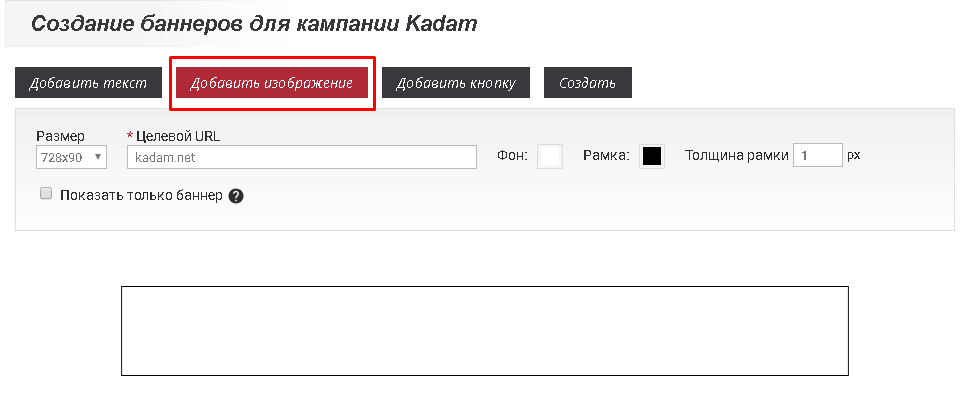 image 2
The boot menu appears on the right. You can download an image file from your device or specify a link to an image from any site on the Internet. You can download both a static image and an animated one. Supported file extensions: gif, jpg, jpeg, png. The weight of the image file should not exceed 1 mb (image 3).
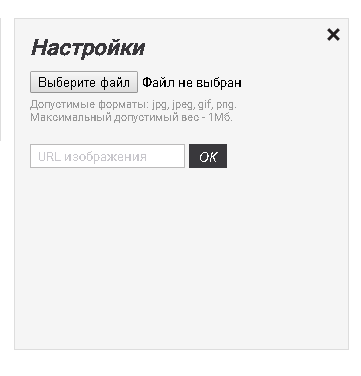 image 3
After the image has been loaded, it will be possible to resize it, set and edit the image frame, round the corners, set the transparency, rotate (image 4).
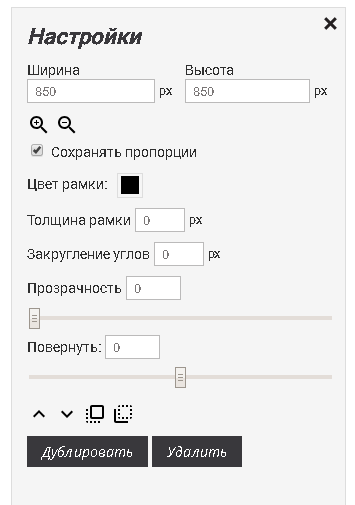 image 4
Adding and editing a button
To add a button to the banner, click "Add button" button (image 5).
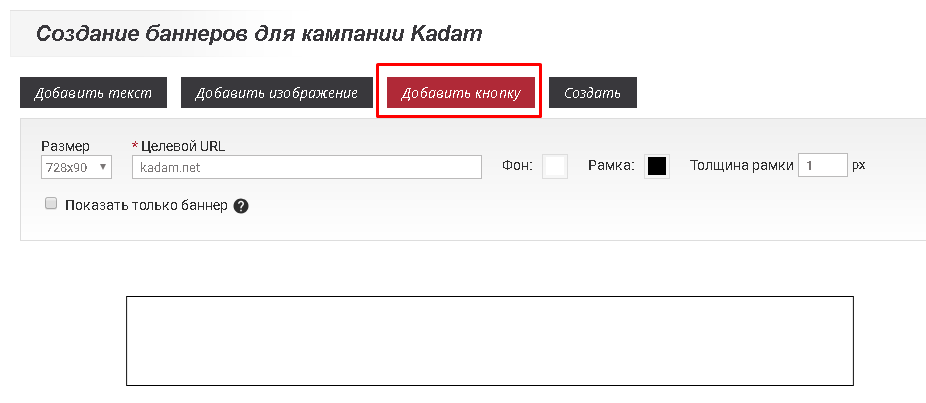 image 5
The button is added automatically and it will be possible to resize it, set the background color and button frame, round corners, set transparency, shadow, rotate (image 6).
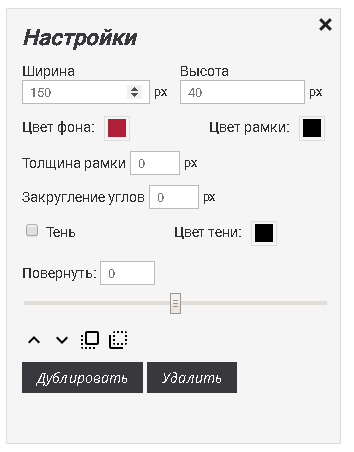 image 6
Adding and editing text
To add text to the banner you need to click "Add text" (image 7).
 image 7
The text is added automatically and you can change its content, font, size, style, alignment, color, shadow, rotate (image 8).
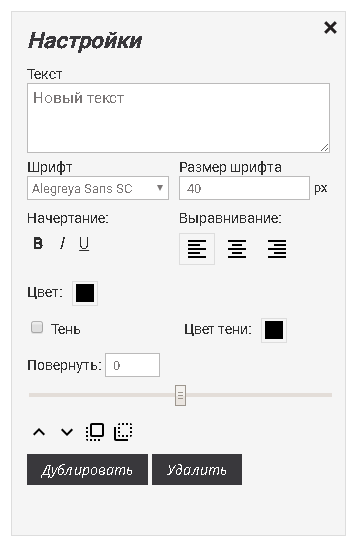 image 8
You can switch between all banner elements using the mouse cursor by clicking on the desired element and using permutations of plans between elements (image 9).
 image 9
Setting the frame and background
Clicking on the color squares you can set the background color, frame color and frame thickness, if necessary (image 10).
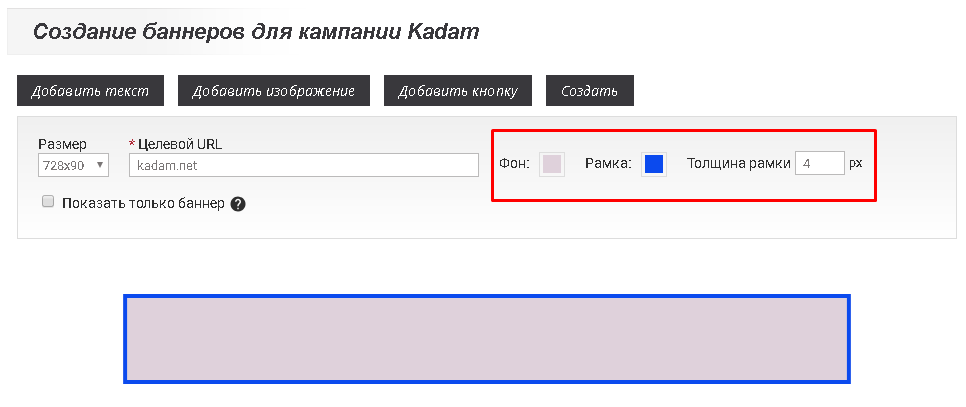 image 10
After editing all the elements to add a banner to the campaign, you need to click the "Create" button (image 11).
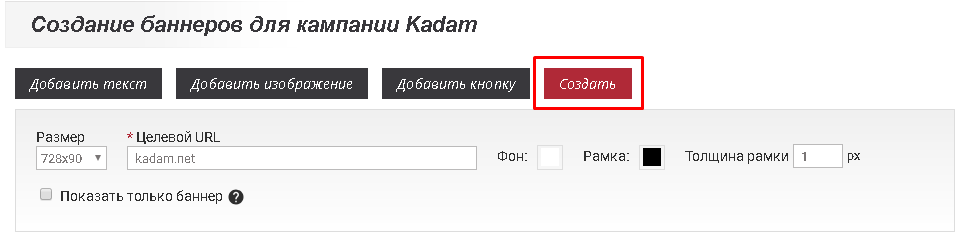 image 11
See also.


